Pull-ups can be considered one of the most effective exercises performed with your own weight. All you need for training is a bar and the desire to work on yourself.
The main benefit of pull-ups is that they allow you to work almost all the major muscles of the shoulders and back:
- back muscles (latissimus, trapezius, rhomboids, teres)
- breasts (major and minor pectorals)
- serratus anterior muscles
- shoulder muscles (biceps, brachialis, triceps, rear deltoid) and forearm
- the press performs static work to fix the vertical position of the body
How to exercise on the horizontal bar
The effectiveness of exercises largely depends on the correctness of their implementation. Pull-ups are no exception. Let's look at the rules that apply to each type.
- pull-ups are performed using muscle strength, without inertia and body swaying
- lifting is carried out without jerking
- The chin at the top of the lift should be above the bar
- the descent is smooth, equal in time to the ascent
- correct breathing: exhale on the way up, inhale on the way down
- strong grip
- vertical position of the body
- The starting position for all types of pull-ups (except for pull-ups with a wide grip behind the head) is hanging, bending in the back, legs bent at the knees and crossed
Types of grips for pull-ups
Pull-ups can be performed in different ways. In this case, methods mean changing the grip: its width, the location of the hands on the crossbar. There are other ways to vary the load when performing pull-ups. For example, changing the time of the negative and positive phases, using additional weights, the technique of incomplete amplitude (partial repetitions). But it is precisely working with different grips of the bar that allows you to optimally redistribute the load between individual muscle groups and effectively avoid the occurrence and development of muscle adaptation. There are 4 main grips: regular (aka upper, medium in width), wide, parallel and reverse grip (narrow).
A short list of grips and muscles involved
Depending on the width and method of grip, you can practice on the horizontal bar as follows:
- narrow overhand grip (brachialis, serratus anterior and lower lats)
- narrow reverse grip (biceps, lower lats)
- medium straight grip (muscles of the back, shoulders and chest)
- medium reverse grip (lats, biceps)
- wide grip to the chest (top of lats, trapezoid, round)
- wide grip behind the head (trapezius, upper and middle part of the lats, round)
- neutral grip (lats, triceps, brachialis, serratus anterior)
The wider the grip, the more the back muscles work. The narrower the grip, the more the muscles of the arms and chest are activated.
Now let's look at the basic grips in more detail.
Width – slightly wider than shoulder width, overhand grip (palms facing outwards). At top dead center, the arms are fully bent at the elbow joint, the chin is above the bar. At bottom dead center, the arms are fully extended. The exercise should be performed without swinging, the negative phase (lowering of the body) is a controlled descent. Typically, the negative and positive phases of the exercise are performed at the same speed, however, the biceps are more sensitive to the negative phase of the load, so many athletes recommend performing the negative phase approximately twice as long as the positive phase. If an athlete cannot pull himself up on his own, then a partner helps him with this, lifting him up and allowing him to slowly lower himself (using the controlled descent method) - this is one of the ways to learn how to pull himself up. In regular grip pull-ups, the biceps, trapezius and latissimus dorsi muscles are evenly loaded.
 There are two methods of execution: with a regular wide grip (slightly narrower than in pull-ups with a regular overhand grip) and a narrow grip. In both cases, the grip of the hands is lower (reverse), so that the palms look inward. The exercise primarily targets the biceps and lats. Moreover, the narrower the grip, the greater the load on the biceps. A distinctive feature of the exercise is that here, like nowhere else, the amazing property of pull-ups is manifested - the muscle on which attention is focused is subjected to training. Reverse close grip pull-ups are considered one of the best ways to pump up your biceps.
 In contrast to the previous movement, here the muscles of the back are mainly loaded - the latissimus. At the top point, the head is behind the bar in such a way that the trapezius muscles of the back and shoulders almost touch the bar. If the exercise is performed, trying to touch the bar with your chest, then the front deltoids will develop (in combination with the barbell press, this technique gives amazing results in increasing the mass of the pectoral muscles). Similar to the previous exercises, wide-grip pull-ups should be performed slowly, with a controlled descent.
 The exercise is focused on developing the lower sections of the latissimus muscles, while the range of motion is shortened, and the bar is touched with the chest, not the chin. When moving through the full amplitude and/or until the chin touches the bar, the pull is carried out primarily through the strength of the biceps, rather than the lats. Hands are placed as narrow as possible. Serves as an excellent finishing exercise in lat training.

There are a large number of different exercises, many nuances and subtleties in the technique of performing them. One of these nuances is the type of grip that is used when performing a particular exercise. And really, how to grip the bar correctly, how to place your palm on the horizontal bar, from below or from above, and at what width should you keep your hands on the bar?
Why are different grips used?
Different grips are used to pump muscles from different angles, more concentratedly affecting one or another area of the muscle group. By changing your grip, you change the groups of muscles being worked.
Thus, it turns out that there is no universal answer to the question: Which grip will be correct or which grip will be more effective. In most cases, the choice of grip will depend on the specific exercise and the goals you set for yourself when performing it.
Types of grips.
So, what types of grips are there? Depending on how your palm holds the bar or bar, there are three types of grip:

Straight or overhand grip.
Also called a pronated grip, from the word pronation, which means an inward rotational movement. In a position where the arms are lowered down, with this grip the palms will look back.
Neutral or parallel.
In a position where the arms are lowered down, with this grip both palms are facing the body and looking at each other. A neutral grip is also called a grip on the horizontal bar when the palms face in opposite directions.
Reverse or underhand grip.
The so-called supinated grip, from the word supination, which means an outward rotational movement. In a position where the arms are down, with this grip the palms will face forward.
When performing exercises, the distance of the hands from each other is of great importance, therefore, depending on the width of the hands, grips are also divided into three types.
Narrow grip.
With this grip, you should place your hands narrower than shoulder width. The amplitude of movement with a narrow grip is the maximum, which has a beneficial effect on the result. However, using a narrow grip, you often connect non-target muscles, such as triceps, which take part of the load on themselves and the effect of the exercise is reduced.

Medium grip.
With this grip, your hands are shoulder-width apart. The medium grip is the most common, considered classic and often serves to comprehensively work out the muscles involved in the exercise. Ideal for beginner athletes.

Wide grip.
A wide grip is a grip when your hands are positioned wider than your shoulders. With this grip, you can focus on the target muscle. However, this grip often reduces the effectiveness of the exercise, since it significantly reduces the range of motion.

According to the position of the thumb when gripping, grips differ into closed and open, or safe and dangerous, respectively.
Closed grip.
In this variant, four fingers hold the bar or crossbar on one side, and the thumb holds it on the other side, as if wrapping it in a ring. When performing exercises with a barbell, this type of grip is usually used, since it allows you to safely hold the apparatus. When performing exercises on the horizontal bar, it allows you to hold onto the bar more tenaciously.
Open grip (monkey, military).
This grip option is that the bar or crossbar is grasped not with four fingers, but with all five. In this case, the thumb does not hold, but simply touches the projectile. This grip is believed to help you press more weight. However, since the projectile can come off your hand, it should be used with great care. In exercises with dumbbells, such a grip is generally not recommended. When doing pull-ups on the horizontal bar, quite a lot of people use this grip; on this apparatus, this grip is also called a monkey grip or a military grip.

So let's look at what grips are used on different equipment.
Grips when training with a barbell.
When performing exercises with a barbell, a closed grip is often used, which allows you to clearly fix the projectile in your hands. But there are still athletes who find it more convenient to hold the barbell with an open grip. This mainly applies to barbell exercises on the back and presses, especially the bench press, but since it is not safe, it will be better to use a closed grip.
The choice of a forward or reverse grip is often determined by the exercise itself, but different grip widths are often used when exercising with a barbell. All kinds of presses and rows are often recommended to be performed with different grip widths, which contributes to a more complete development of the target muscles.
Grips when training with dumbbells.
Dumbbells should always be held with a closed grip. Unlike the barbell, in exercises with dumbbells it is possible to change the grip directly during the exercise; this is often used. Holding the projectile at the starting point with one grip, we change it to another at the end point.
An example of changing a direct, neutral or reverse grip would be the Arnold press or dumbbell lateral raises, when we supinate or pronate the dumbbells when pressing to the top point. In exercises with dumbbells, the width of the grip is the distance between the hands, which is also customary to change in some exercises, bringing the hands together at the top point and spreading them out at the bottom, for example when bench pressing dumbbells.
The ability to use these techniques gives dumbbells an advantage over the barbell, which allows for a more diverse impact on the muscles and, ultimately, a beneficial effect on their development.
Grips for pull-ups on the horizontal bar.
This is where all sorts of different grips are used, namely when doing pull-ups on the horizontal bar. What you get as a result depends on exactly how you grab the crossbar. Different grips will help athletes with different levels of training achieve the desired result.
Using a reverse grip helps beginners master pull-ups, as it makes it easier to perform the exercise due to the fact that stronger biceps are involved in the work and removes some of the load from the back. The width of the grip helps the experienced athlete concentrate the load on individual areas of the back and work the target muscles.
As you can see, different grip styles are an important part of the training process, so it is recommended that you take the time to learn how to use them in different situations. Knowing the intricacies and characteristics of different types of grip and applying them in practice will help diversify and improve your training, which in turn will help you achieve the result you want.
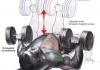
Every day we hold it in our hands. Computer mouse. Everyone holds it differently, and if you ask a question about how we hold it, many will fall into a stupor and, with a question in their eyes, put their hand on the mouse and exclaim: “That's it!” If you pay attention to how each of us puts his hand on his faithful rodent, of course, it will not be possible to predict the future or find out who he was in a past life, but you can try to guess how a person uses it.
I'll tell you about the most common mouse grips. There are three types of them: palm, fingers, “claw”.
First grip. Palm.
The first grip I chose was the palm grip, most likely because it is the simplest and most common.
The heel of the palm is placed on the table, and the fingers clasp the mouse on all sides, the index and middle fingers are fully extended and lie on the mouse. The pads of your fingers press the buttons. Horizontally, the mouse is moved by turning the hand to the right and left, but vertically, the entire forearm is moved with the elbow raised, or even driven by the shoulder joint.
Typically, people with large hands and large arms have this grip. Most often, this grip is used by those people for whom the accuracy and speed of cursor movement is not very important, and the mouse is rarely moved.
For the most part, this is how most office workers who spend all day in front of a computer monitor hold their mouse. Among gamers, fans of indies, strategies, quests and MMOs, as well as fans of the MOBA genre, have this grip.
Subjective feelings. I couldn't play for long with this grip. The grip does not provide sufficient accuracy and speed, but the hand does not get tired at all. In shooters, it was often impossible to reach the enemy; it was anatomically impossible to adjust the sight. But in strategies, this grip turned out to be optimal; after several hours of continuous clicks, no fatigue was noted, although sometimes it was necessary to pick up the mouse and put it back on the table in order to replenish the resource of turning the hand.
Second grip. Fingers.

The second grip I chose was a finger grip, sometimes called a finger grip. Probably the fastest of all grips.
The mouse is grasped directly with the fingertips. They grab the mouse from the left, right and top. The mouse can be moved in any direction by moving your fingers. With this grip, the buttons are pressed with your fingertips.
This grip is suitable for mice and palms of any size without preference. Often this grip is used by people for whom speed is important, but accuracy errors are not critical. This type of grip is usually used by designers, editors, and some office workers. This grip is universal for gamers, used by players of all genres, excluding first-person shooters, where accuracy is very important.
Subjective feelings. At first I just couldn't play. My ambidextrous mouse flew away from my fingers, I had to pick it up again, and there were also unintentional button presses. After getting used to it in shooters, the speed of aiming at the enemy increased, but the accuracy suffered, it was possible to shoot further than the enemy was or a little closer. There were no problems in strategies or indies.
Third grip. "Claw".

The third grip I chose was the Claw grip. The golden mean among grips. The most accurate, the speed is not inferior to the finger grip.
The mouse is grasped using the pads of the fingers, and the mouse also rests against the base of the palm. The manipulator is driven by the hand and brought to the desired point using the fingers. The Claw grip is a hybrid of the palm grip and the finger grip. This method of manipulating the mouse allows you to quickly move it and accurately hit the target.
The grip is suitable for all hands and hands. Even though it is a hybrid grip, the grip is not very suitable for quiet games, for example, strategies and quests, the speed and accuracy that it provides is absolutely not needed here, and, in most cases, the player switches to a palm grip, which provides maximum relaxation of the hand. “Claw” is usually chosen by gamers who actively play shooters and other dynamic genres.
Subjective feelings. This is my standard grip. I've been playing with it for many, many years and have no problems. Any genres and games are suitable, sometimes it’s too fast for quiet games, but for shooters it’s just right, and with this grip, accidental button presses are eliminated, since the fingers are almost perpendicular to the keys.
It is impossible to recommend the best grip, which will improve your performance. It depends on the size of the palm, the mouse, preferences and even the mouse pad, which is worth talking about separately.
A difficult question in mouse affairs is the question of whether what to actually ride on.
There are many mouse pads, which are divided into plastic and rag. Most likely, no one will be able to give a definite answer on which carpet is better to ride on, but you can choose for yourself by reading their description.

Rag carpets are good for those who need increased accuracy in positioning the mouse on the surface, as well as for those who do not tolerate accidental slipping. Since carpets are sewn in much the same way as any clothing, this means that there are many high points on which the sensor “clings”, increasing the accuracy of cursor movement. Sometimes, with very careful movements on the carpet, you can notice that the cursor does not move constantly, but tries to jump over a couple of pixels. This happens because the sensor is at a point between two heights. A subjective advantage of such carpets may be that the mouse moves across them almost silently.
Rag carpets are chosen by those people who vitally need precision, but due to the fabric structure, the speed of movement of the mouse on the carpet may suffer; this will be very noticeable if the mouse’s legs have already worn out, although it is quite difficult to spoil them on a rag rug.
I very rarely rode on rag mats, but the memories are not very bright. The speed of mouse movement suffers, and the increase in accuracy is not noticeable to the naked eye. The advantage of such carpets can be considered easy transportability, the danger of spoiling it is minimal.

Plastic rugs do not have any important advantages over rag rugs other than their durability. You can literally wipe a hole in a rag rug, which you can’t do with plastic, and it’s easier to take care of it - wipe it with a wet cloth and continue the fight.
You can make a plastic mat of any kind, either to minimize the number of roughnesses to a minimum so that the mouse glides better, or to add the maximum number of them to improve the accuracy of cursor positioning. Unfortunately, plastic mats tend to wear out mouse feet at twice the rate.
Based on subjective feelings, I can say that I have been using a plastic mat for three years now and have not noticed any problems or limitations with such a coating, and the mouse’s legs are intact.
The main task of a mouse pad is to provide a flat surface for the manipulator, without unexpected dust particles, depressions, etc. The rugs also provide a tactile limitation of the rodent’s habitat; the rodent will simply, excuse me, fall from it if you go beyond the boundaries. An important feature of some carpets is the presence of a wrist cushion, which ensures the anatomically correct position of the wrist, eliminating all kinds of hand diseases.
If you find an error, please highlight a piece of text and click Ctrl+Enter.
Unfortunately, for certain reasons, there is no established terminology in the Russian language dedicated to playing percussion instruments. I propose to agree on the translation of the relevant terms and use them, at least in communication on the forum of the site - a forum of drummers.
Grip - grip, fulcrum - lock (English: “point of rotation” - the place where the stick is fixed with two fingers). For example, by Traditional grip we mean “traditional grip”, and not “traditional lock” or “traditional positioning”.
This article is mostly translated from several authoritative sources (usually classic American textbooks). You can always ask the nuances of technology on the forum of teacher Tigran Panteleev -.
There are many options for gripping sticks - each has its own advantages and purposes, depending on the music being played, the instrument and the physiology of a particular drummer. The grip when performing fractions may differ from the grip when performing twos. Many professional drummers use different types of grips during the course of a single song.
Strictly speaking, there are two types of capture:
1) Traditional (variants of the name traditional, conventional, orthodox, rudimental grip). The left hand holds the stick differently than the right (for left-handed people it’s the other way around).
2) Symmetrical grip (matched grip). The left and right hands hold the stick in the same way.

Symmetrical grip(other names are parallel and paired).
Symmetrical grip is more common. Therefore, first we will analyze the symmetrical grip and its variants: German (palms facing down), French (thumb on top, palm almost perpendicular to the floor) and American (middle position).
The first lesson with a qualified teacher begins as in a video school, drummer Jojo Mayer, where he recommends finding the balance point of the stick. The grip point at which the stick has the freest rebound (usually about 12 centimeters from the thick end of the stick - approx. website - drummers forum).
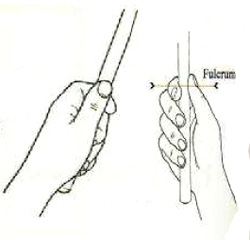 At the found balance point, hold the stick between the pad of the thumb and the second phalanx of the index finger (closer to the bend towards the nail)*. The formed clamp in the fingers is called a lock (fulcrum). Its task is to create conditions for free rotation of the stick on the created fulcrum from the phalanx (or joint) of the index finger. Everyone determines the degree of clamping of the stick for themselves in practice. The main condition is to avoid tension in the muscles, even at the cost of the sticks slipping out of your hands.
*note: There are other lock options. The index finger is closer to the other joint, which is closer to the palm. And the option that Dave Weckl, Jim Chapin, Steve Smith, Joe Morello, John Riley offer in their video schools is on the middle finger, index finger on top, thumb on the side, middle finger on the bottom.
Pick up the tip of your index finger and lightly grasp the stick with the remaining fingers. The resulting hook of the index finger helps the stick with a weak rebound. There is no need to hold the stick with your other fingers.

Another point that most teachers, including Dave Weikle in his video school, emphasize is to make sure there is a gap between the thumb and index finger. This is one of the indicators that the hand is not clamped. But at the same time, the option when there is no gap and the thumb lies completely on the stick is possible when playing twos and in cases where you need to play loudly and quickly. For example, marching drummers play without this gap.
 The correct position of the arms can be achieved by first lowering the arms along the body without chopsticks and relaxing the shoulders. Raise your forearms to a position almost parallel to the floor. Pay attention to the hands, there are no bends in the wrist, the hand is a continuation of the forearms, palms down. The hands are naturally raised in the same (or almost the same) plane with the forearm, the elbows are not pinched and are slightly moved to the sides.
Palms down is the so-called German grip, the most common option among snare drummers in symphony orchestras. Thanks to greater freedom of movement of the brush (up and down), it is excellent for playing rudiments in different dynamics. The German grip has been replaced by the American grip, where the hand is turned clockwise by 30-40 degrees. This option is more convenient for moving hands between the drums of the kit and gives more freedom when using the Moller technique in different dynamics, while maintaining the power of the German grip.
The third variant of symmetrical grip comes from playing the timpani - the French grip. Thumb on top, palms facing each other, hands perpendicular** to the floor. It is convenient for finger technique, therefore it is often used for playing fractions with single strokes and in playing cymbals, where the rebound is worse compared to the head of the drum. The French pick is played by such famous drummers as Billy Cobham and Simon Phillips.

** note: When they say “parallel” or “perpendicular”, they omit the word “almost”. The German grip varies from completely parallel to 10 degrees rotated, the French grip is usually not 90, but 80 degrees, i.e. slightly turned inward by the same 10 degrees.
The position of the snare drum or practice pad is also important. Adjust the height so that the top rim is 10 cm (about the width of your palm) below your navel.
Traditional grip(another name is classic).
The traditional capture has its roots in the military marching tradition. If you play a drum that hangs on your shoulder, then the drum will slide to one side - more precisely, to the right side, and your left hand will hit the rim. The traditional grip allows you to carry the stick over the rim of the drum, while at the same time maintaining the angle of the stick relative to the surface of the drum (this is why many drummers who play with a traditional grip tilt the snare drum away from themselves - approx. website - drummers forum).
The leading hand (the right hand for a right-handed person) holds the stick as if in a symmetrical grip. Bend your relaxed, weak arm at the elbow and open it as if you were holding a tennis ball. Place the stick on the connective tissue between the thumb and forefinger, forming a lock. This will be the fulcrum, similar to the lock in the symmetrical grip, around which the stick rotates.

To get a feel for the traditional grip and enhance the feeling of the lock, try this exercise: the stick is in the lock, the hand is looking to the side (Fig. 4). Apply relaxed blows by rotating the hand around the axis of the forearm (movement from the elbow).
To complete the grip, place your index finger with the top knuckle on top of the stick. The middle one is extended from above along the stick in a straight position, as far as its relaxed position allows. The phalanx of the nameless one serves as a support for the wand, the little finger is tucked. The palm looks to the side; it is important not to open it upward. The hand is in line with the forearm, without kinks to the sides.

In all grips except the American one, the heads of the sticks are above the center of the drum, the angle between the sticks is approximately 90 degrees. In the American capture the angle is less than 90.
 Use the recommendations as a guide, but you shouldn’t neglect the advice of an intelligent teacher either. There are many modifications of grips; this article shows the most common ones. The proper effect, subject to the above rules, has been time-tested by the example of many drummers. These grip options allow you to play with relaxed hands in a natural position and build up your technique.
Options for different grips have been discussed more than once on the drummers' forum - a site whose main rule was arrived at in the discussion: the absence of dogma. It is more important to understand the “physics of the process”: how the blow is struck, how the stick bounces and how to control it. The variety of grips is an attempt to control as conveniently as possible the natural forces acting on the sticks when playing. In other words, adapt to your hands the natural movement of the stick to which it gravitates and add ergonomic muscle work. The musician’s task is to freely sound the instrument, and with which fingers the stick will be clamped is probably not so important.