Gomukhasana, गोमुखासन n. - Cow Head Pose. Consists of three Sanskrit words: "go"- cow; "mukha"- face, muzzle, head; "asana"- body position.
When adjusting this pose, the practitioner’s body resembles the face of a cow in its shape. The position of the hips in the asana resembles the lips of a cow, the raised hand resembles an ear.
Classification and level of difficulty:
A pose for working out the hip and shoulder joints of medium difficulty level. Relieves tension shoulder girdle and increases elasticity chest. Relieves tension from the ankle joints, stretches the internal ankle ligaments, compensating for the effects of sitting in the Lotus position.
Contraindications:
- Not performed during periods of exacerbation of any chronic diseases;
- Injuries to the knees, lower back or shoulders.
Subtleties of the exercise and safety rules.
- The exercise is very traumatic, and forcing it to master it is harmful to the joints of the arms and legs.
- At the learning stage, it is allowed not to spread the feet to the sides; moreover, to relieve excess tension from the knee and ankle joints, it is recommended to place wooden blocks or books under the buttocks.
- If it is difficult to clasp your hands behind your back, you can use a rope or belt.
Performance:
- Bend your left knee and place your left foot so that your left heel touches your right buttock;
- Then bend your right leg over your left thigh so that the heel of that leg is located next to your right buttock;
- Then clasp your hands behind your back. Extend your right arm up and then lower it down behind your head and back. Stretch your left arm down and then bring it to a position behind your back. Interlock both hands with each other. Take several inhale-exhale cycles.
 In this position, the back automatically straightens.
After staying in this pose for a while, change it so that the right leg is down, the left is up, the left elbow is pointing up and the right is down.
Alternatively, the hands can be placed on the top knee, one on top of the other, or in namaste (palms together in front of the chest).
You can be in this asana either with your eyes open or with your eyes closed, performing shambhavi mudra.
For beginners:
Try performing the asana with a folded blanket under your buttocks. This will make it easier to keep your lower back straight.
For advanced:
While performing the asana, rest your palms on your knees and lower your body down. Hook your chin on your knees, place your hands behind your back, interlocking your fingers. Unscrew the lock and point it upward, opening the chest.
Effect:
- Returns mobility to the hip joints;
- Improves blood and lymph flow in the pelvic area, healing internal organs;
- Makes the calf muscles, thigh muscles and shoulder muscles elastic;
- Opens the chest, straightens the back;
- Is the prevention and treatment of hemorrhoids, prostatitis;
- Has a tonic effect on the endocrine glands;
- The vajra nadi current of apana is blocked, due to which prana accumulates in the area of the muladhara chakra;
- Relieves tension in the shoulder girdle, increases the elasticity of the chest;
- Strengthens the muscles of the arms and shoulder girdle;
- Develops elbow and shoulder joints;
- Calms the nervous system;
- Improves heart function;
- Renews lung tissue and improves metabolism;
- Charges the heart energy center (Anahata);
- Allows you to quickly relax, restore breathing and strength;
- Relieves mental stress, fatigue and tiredness;
- It is useful to perform for rest between asanas;
- Cures leg cramps.
As experienced yogis say, the cow pose helps restrain the exciting thoughts that periodically arise in the head of a modern person.
Anatomy of asana:
Movements of bones and joints
Bottom hand:
- Descent and adduction of the scapula;
- Extension and rotation of the shoulder joint inward;
- Flexion of the elbow joint; supination of the forearm.
Top hand:
- Elevation and adduction of the scapula;
- Flexion and rotation of the shoulder joint outward;
- Flexion of the elbow joint;
- Pronation of the forearm.
The spine position is mostly neutral, with slight extension in the thoracic region due to the position of the arms.
- Flexion of the hip joints with external rotation and adduction of the leg;
- Flexion of the knee joints;
- Plantar flexion of the ankle joints.

Working muscles
Bottom hand:
- Subscapularis muscle (internal rotation of the shoulder joint);
- Teres major and latissimus dorsi (shoulder joint inward rotation and extension);
- Long head of triceps and posterior bundle deltoid muscle(extension of the shoulder joint);
- Biceps (elbow flexion);
- Forearm supports; finger flexors.
Top hand:
- Infraspinatus and teres minor (external rotation of the shoulder joint);
- Serratus anterior (rotation of the scapula);
- Rhomboid major and minor muscles (adduction of the scapula);
- Anterior deltoid muscle (flexion of the shoulder joint);
- Pronator teres;
- Finger flexors.
Since when performing this asana it is necessary to stretch the muscles in the hip joints, you need to use gravity as much as possible.
Stretching muscles
Bottom hand:
- Long head of biceps;
- Pectoralis major muscle;
- Serratus anterior;
- The upper bundle of the trapezius muscle.
Top hand:
- Triceps;
- Latissimus dorsi muscle;
- Teres major muscle;
- Pectoralis major and minor muscles.
- Muscles that abduct the leg at the hip joint (gluteus maximus, medius and minimus);
- Extensor muscles of the hip joint (adductor magnus and posterior thigh muscles);
- Piriformis muscle (due to flexion and adduction of the legs at the hip joints).
Barriers and Notes
The multidirectional movement of the shoulder blades (up and down) serves to prevent them from being brought together too much, in order to prevent excessive load on the shoulder joints. If this is not done, then the joint capsule of the shoulder may be stretched or the ligaments of the biceps and supraspinatus muscles may overlap.
If the hip joints are not mobile enough, then excessive force when taking this pose can affect the knee joints. Care must be taken to ensure that the knees are not subject to excessive stress and that the menisci are not at risk of injury.
Breath
By relaxing the muscles of the abdominal walls and directing your breath downward, you liberate the pelvic floor muscles and hip joints. By tightening your abdominal muscles as you inhale, you direct your breath into the chest cavity, which allows you to better stretch the muscles of the shoulder girdle.
Good time! Since ancient times, the cow in India has been a sacred animal. Therefore, it is not surprising that Gomukhasana (cow head pose or simply cow pose) is included in the 15 asanas set out in the text “Hatha Yoga Pradipika”. That is, this asana is a yoga classic that every yogi should be able to sit in.
Execution method
Options
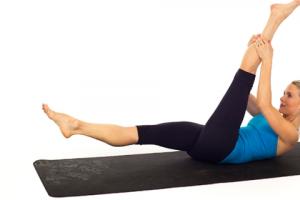
In modern times, a slightly different form of asana has taken root. Its modification is reflected in the position of the hands. Both hands need to be placed behind your back and bent at the elbows. One elbow looks up, the other looks down, and the hands are interlocked, or place the elbow behind the elbow as in the photo. To simplify the exercise, use a bolster, blanket or meditation pillow, which is placed under the buttocks. Maintaining the desired position is much easier this way.

Action
The benefits of Gomukhasana are as follows:
- corrects posture;
- increases blood flow in the pelvic area, prevents diseases of the reproductive and urinary systems;
- and knee joints;
- increases the elasticity of the leg muscles, relieves cramps and spasms in the legs;
- is an excellent compensatory asana after a long stay in Padmasana.
However, you should not take risks and try to sit in this asana if you have injuries or diseases of the knee or hip joints. I tried to make the article short but succinct. Ask any questions you have in the comments. Yoga is of interest to many people now, so reposting it on social networks will be more relevant than ever.
It is recommended to perform cat pose and cow pose alternately in pairs. This complex is useful not only for the spine, but also helps women solve some gynecological problems. There are no contraindications for its implementation. This complex is very simple and accessible to everyone.
Execution technique
Cat Pose
- Get on all fours so that your hands are strictly under your shoulders, and your legs should be positioned in such a way that two right angles are formed (between the body and hips and between the thighs and shins). Don't turn your feet out, your heels point up.
- As you inhale, stretch your crown and tailbone upward, arching your spine. Lengthen your neck. Move your shoulders away from your ears.
- Focus your attention on the deflection of the thoracic spine. The exercise will use all the muscles along the spine, but you should be especially aware of the muscles in the middle and upper back as you move your sternum forward. Don't slacken your shoulders and keep your elbows as straight as possible.
- Bending your head back, imagine that there is an egg on the back of your neck - you must not crush it. Therefore, do not strain the back of your neck.
Cow Pose
- Then, as you exhale, push your back up. Push your palms lightly off the mat. Point your chin towards your sternum.
- Spread your shoulder blades wide, relaxing tense muscles in your upper back and neck. Try to lift the lower part of the spine, draw in the tailbone well. Place your hands on the floor and feel where the skin on your back stretches as the curve increases.
 Now alternate between “cat” as you inhale and “cow” as you exhale in a constant rhythm. Make sure that each bend takes a full breath, and each bend takes a full exhale. After several movements, you will be able to coordinate your rhythm so that the beginning of the movement coincides with the beginning of the inhalation or exhalation, and make sure that they also end at the same time.
This complex normalizes the activity of the hormonal system in women. It should be performed when there are problems in the reproductive sphere, pain during the menstrual period, to restore the body in the postpartum period. The complex does thinner waist, puts the body in order and adjusts the umbilical pulse.
Gomukhasana restores mobility to the hip joints, stretches latissimus muscles back and triceps, increases the elasticity of the muscles of the thighs, shoulder girdle and ankle ligaments.
The asana ensures the flow of blood and lymph to the pelvic area, heals the internal organs, forms correct posture and opens the chest.
Contraindications
- Injuries to the knees, lower back or shoulders.
Performance
- Sit on the floor and bend your knees, placing them half a meter from your buttocks. Place your left foot under your right knee and position it on the right side of your pelvis so that your left knee is pointing forward. In the same way, place the right foot on the left side of the pelvis.
- Place your knees one above the other, lift your body, lower your pelvis between your heels. Make sure your body weight is distributed evenly across both sit bones.
- Place both hands behind your back: the right one through the top, the left one through the bottom. Clasp your palms together. Straighten your lower back, lower your chin slightly, stretch your neck upward.
- Relax, breathe calmly. Stay in the pose for 1 minute, then switch hands.
- Perform the asana by changing the position of your legs.
Possible mistakes
- You arch at the waist
- You twist your pelvis
- You move your shoulders out of line
For beginners
Try performing the asana with a folded blanket under your buttocks. This will make it easier to keep your lower back straight.
For advanced
While performing the asana, rest your palms on your knees and lower your body down. Hook your chin on your knees, place your hands behind your back, interlocking your fingers. Unscrew the lock and point it upward, opening the chest.
Bitilasana, which translates to “cow pose,” is a therapeutic yoga pose that is easy to master. It perfectly helps to stretch the front of the torso and neck, gives elasticity to the back muscles, gently massages the spine and abdominal organs, and prevents pain in the upper back and lumbar region. The asana causes an influx of energy, helps relieve stress, is recommended for asthma, and to normalize blood pressure. Perfect for pregnant women, great for relieving stress.
The abs, chest, hips, kidneys, liver, upper, lower back, shoulders, neck, pelvis are worked on. With constant practice of the asana, the space between the spinal discs increases, the muscles remember the natural curve of the spine. If you have back problems, then follow the recommendations of articles about and about.
Contraindications
- Avoid sudden movements, the technique requires only smooth execution, otherwise you can unnecessarily load your back;
- Start all movements in the spine area from the tailbone, the neck is the last to move;
- If you have tender skin on your knees, place a mat before doing the exercise.
Technique for performing Bitilasana
1. Get on all fours.
2. The knees should be positioned strictly under the pelvis, and the shoulders, elbows and wrists should be aligned in one line and perpendicular to the floor. The head is in a neutral position, eyes looking at the floor.
3. Inhale, lifting your head up slightly and looking at the ceiling. Do not throw your head back too much; you should lift it slightly to stretch the neck muscles.
4. Start moving your body forward (knees, palms static). At this moment, all parts of the spine are stretched.
5. Inhale, and as you exhale, gradually return the body to its original position.
6. Repeat the asana from 10 to 20 times.
7. You can complicate the technique a little; position your hands and knees in such a way as to create maximum extension of the spine when moving the torso.
8. This asana is similar to.