Summary of GCD on modeling in the preparatory group "Walruses-athletes"
Educator: Ilyina M.V.
Target: Foster a love of sports, consolidate knowledge of winter sports.
Tasks.
Educational:
Encourage an independent search for ways to depict northern animals (walruses-athletes) based on illustration or presentation, conveying features appearance and proportions.
Teach children to compose a collective composition from sculpted figures (place one after another or next to each other).
Developing:
To develop the ability to apply familiar methods and techniques of sculpting (sculptural, combined, constructive, stretching, bending, working out details with a stack, flattening, rolling, cutting, smoothing joints).
Develop a sense of form and composition.
Educational:
Foster a love of sports.
-Integration of educational areas: social and communicative, cognitive, speech, artistic and aesthetic, physical development.
Preliminary work:
Conversation about the upcoming Olympic Games in Sochi 2014. Viewing pictures “Winter sports. A conversation about different parts of the world, about the North as a collective concept, its characteristic features. Examination of images of animals of the north. Discussion of the concepts of "ice floe". Didactic game "Name the sports".
Materials and equipment:
Pictures "Winter sports". Letter from Magpie. Walrus sculpting scheme. Boards, plasticine, stacks, Russian flag, "ice floe", rice grains, beads, fishing line, toothpicks, napkins.
Methods and techniques:
Practical (surprise, finger gymnastics, physical education);
Visual (viewing, observing, showing methods of action, a sample);
Verbal (conversation, creating a game situation).
GCD move.
Organizing time:
Letter from Soroka (invitation to participate in competitions among animals of the north - walruses).
Chatting with children.
Educator: To take part in them, let us sculpt our walruses-athletes from plasticine, who will participate in competitions and win gold medals there.
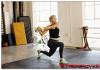
Educator: Let's take a closer look at the picture with the image of the walrus (we highlight the parts of the walrus body with the children: torso, head, flippers, large lips with a mustache, tusks, eyes).
Finger gymnastics.
Connect the fingers of the same name, starting with the thumbs
Winter has come to us again.
Index and middle fingers "step" on the table
We love to play games.
Squeeze - unclench your fingers into fists
We are merrily rushing from a high mountain
Bend the fingers of both hands, starting with the thumbs.
We go skiing, we fly on sleds
And in snow-white skates we slide
We make a snowman all together.
The winter would never go away!
Clap their hands.
Show of the mode of modeling by the educator. The sports walrus costume can be of any color. Think about who your walrus will be (skier, hockey player ...).
Children independently complete the task.
Educator:
Now let's show our athletes how we do exercises.
Every day in the morning
We are doing exercises.
We like everything very much
To do in order:
Have fun walking (1,2,3),
Raise your hands (1,2,3).
Raise our hands
We put our hands down.
Squat and get up
Jump and jump.
Educator: Well done! And now it's time for our walruses to hit the road on a big ice floe to their friends-athletes, where they will take part in competitions.
Analysis with children. Children approach their work, examine, talk about their athletes.
Target : Teach make up plot composition from fashioned figures . Sculpt from plasticine figure human v movement .
Tasks :
Anchor way sculpting cylinder ( roller ) incised With two ends .
Continue teach hand over v sculpting not complex movement ( flexion hands and incline torso , moving feet ).
Teach smooth out surface shape .
Teach relate parts body human on magnitude and proportions .
Developing tasks :
Continue develop skills hand over small details , working fingers .
Develop skill enjoy stack , share detail on the parts .
Educational tasks :
Bring up independence .
Bring up accuracy at work With plasticine and small details .
Materials (edit) , equipment : ( plasticine , stacks , oilcloths , napkins );
Layout ski slopes. TV, pictures about winter sports.
GCD.
Children. Tell. What season is over?
-season is over -winter.
Let's remember winter sports. (Showing pictures on TV)
Children call: hockey, figure skating, short track, speed skating.
_ guess the riddle:
Wooden two horses
Down the mountain they carry me.
I hold two sticks in my hands,
But I do not beat the horses, I feel sorry for them.
And to speed up the run
I touch the snow with my sticks.
-Who is this poem about?
-It's a skier.
-What kind of sport do skiers participate in?
-Biathlon, ski grade, ski jumping slalom. (Displaying pictures)
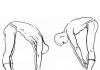
- now take a close look at the skier who is skiing. Guys, what is his body?
Straight or is it tilted forward?
-It is tilted forward.
-Correct, the skier's torso is tilted forward, and the head is lowered.
-What does a skier need ski poles for?
-to push off, move.
Let's get some rest. (Physical minute)
Athlete on the track
Trains her legs.
Raises them high
Cheerfully. Walking merrily.
Spread his arms to the sides
And he went quietly.
Hands down then forward
He jumped, made a turn.
Small people like to do physical education.
Sit on the chairs.
Take a look. We have a ski slope. But it is empty.
Do you want skiers to ski on this track?
You blind each skier and put them on the track.
Let's take a look at the figure of a skier. (PICTURE SHOW)
-HOW DOES THE SKIER WEAR? (HAT, JACKET, PANTS ON THE HEAD)
-What parts does a skier consist of?
-HEAD. TRUNK, LEGS.
First, guys, let's look at the geometric shapes on my desk. Name the shapes. square - cube - prism, layer - CYLINDER.
Now guys, let's define what geometric shapes look like parts of the human body.
Children's answers: ball - head; CYLINDER - torso. Legs are ovals.
SHOW IN THE AIR WHAT MOTIONS YOU WILL SCULPT YOUR HEAD (CIRCULAR) BODY (STRAIGHT).
YOU HAVE A BLUE PLATE ON YOUR BOARD. Divide the plasticine into two parts, make one larger, the other smaller.
The part which is larger is the body, and which is smaller is the legs.
Take the part that is larger and roll a cylinder out of it, with a stack we cut the upper part into two parts, up to the middle of the cylinder - these are the hands.
Extend the right hand with the left. Let's take the second piece of blue plasticine
We roll it into a sausage with straight movements, and bend it in half, put our legs to the body, rub it with our fingers. We sculpt shoes to our feet from black plasticine, press them to our feet. Take a yellow piece of plasticine and roll our head in a circular motion, place it on our shoulders.
Making eyes. A hat. The skier has sticks in his hands, we make them from toothpicks
Take toothpicks and insert them into the hands of the skier. It must be put on the skis. On the tables are cardboard ski blanks. Let's put the skier on the skis, and in order for him to ride down the mountain, we will attach paper clips to the skis, I have a long stick with a magnet, look. I put a magnet under the skier and he goes.
Children tell me why this is happening. Why does the skier move?
Because magnets attract metal.
Let's give them names, attach paper clips and put them on the mock-up.
The children have finished their work. Clean the boards with a napkin.
The guys tried very hard. with zeal they fastened the details of the craft with plasticine. We tried to give each skier individuality and originality. And one of the guys even gave a name to his ward. And look at the result!
-
Modeling in the preparatory age group is in the nature of working out previously mastered skills, therefore, the content side of the lesson becomes more complicated. If earlier children sculpted animals, toys, food, then at the age of 6-7 years in the center of the composition there will be a human figure (for example, a girl playing with a ball, a soldier and a skier). Consider the stages of preparing a lesson on sculpting a person in motion.
Preparatory stage
Children have grown up, and new techniques for working with plasticine are available for them. From sculpting on a plane, which implies the creation of a kind of paintings, plasticine bas-reliefs on a sheet of cardboard or paper, and from simple forms (balls, lumps, figures without complex details), the guys move to voluminous standing and walking figures that require taking into account the proportions and laws of balance.
Playing with plasticine is an important part of getting ready for school.
What methods of modeling from plasticine can be used
Children 6-7 years old are already familiar with constructive (a composition is created from separate parts, like a constructor), sculptural (all parts of a figure are made from one piece) and combined methods (combining constructive and combined). For sculpting a figure in motion, it is more convenient to use a constructive method - it makes it easier to convey small details, such as, for example, palms, facial relief, etc.
Sculpting techniques
In this group, children consolidate previously mastered sculpting methods, including:
- rolling out elements (creating a "ball");
- rolling (rolling "sausages");
- indentation, that is, the creation of indentations with your fingers on the form;
- flattening (making "pancakes" from balls);
- pinching (clamping a piece and flattening it with two fingers);
- pulling (pulling an element out of a piece);
- accession;
- smearing (building up elements on the base and smearing the boundaries of the connection);
- pinching (clamping the part, but without flattening);
- stretching (stretching elements while maintaining the overall shape);
- smoothing (smooth transition of craft elements into each other).
Almost all of these methods are useful when working with a human figure.
Variants of the composition on the theme "Man in motion"
Modeling of a non-static figure can be presented in the following variants of themes for composition, which can be timed to coincide with a specific educational block:
- "A girl plays with a ball" (when studying topics related to summer fun);
- "Skier" (in the process of studying materials related to winter sports);
- "A girl and a boy are dancing" (for example, on the eve of the New Year);
- "Soldier" (this composition can be dedicated to February 23rd or May 9th), etc.
As you can see from these examples, most of the options for such sculpting in calendar-thematic planning are related to the winter theme. This can be explained simply: by the 2nd semester, the guys repeat and consolidate all the basic techniques and methods of sculpting, which allows you to create complicated structures, which include the human figure.
Preliminary work with the group
Although the technique of sculpting a human figure is relatively simple, the teacher in the classroom for the development of speech and in physical exercise workouts preliminarily examines the features of the person's posture with the children, drawing their attention to such nuances as:
- body tilt angle;
- head turn;
- bend of arms and legs, etc.
In addition, even before starting to work with plastic material, an adult individualizes the process as much as possible. That is
- divides the responsibilities for the preparation of the workplace and the necessary tools between the guys;
- allows you to choose the color scheme of plasticine for crafts;
- helps to determine the position of the limbs (if children perform a composition, where the pose of the figurine can vary), etc.
It is advisable that the choice of the color scheme of the man's costume is left to the child.
Motivation
Already at the stage of individualization (that is, preparation for the lesson), the motivation of the little ones begins. However, the first part of the lesson should be planned so that the kids are interested in the result of the work, and, which is very important, in the sculpting process itself. For this, the educator can use a number of techniques.
It is interesting. The famous Italian teacher, philosopher and humanist of the late XIX - early XX century Maria Montessori said: “Do not limit yourself to just one teaching aid, for example, cards. Cover one topic in different ways: in games, posters, books, cartoons. "
One of the options for motivation can be a preliminary drawing of a sample of a man in motion.
Conversation and clarity
If we rank the most effective ways to tune children to work, then, of course, the conversation will be in first place. The main thing is to build it correctly. Usually these are questions from an adult, to which the kids answer one at a time or in chorus. For example, before creating a dancing children figure, questions might be:
- When do people dance?
- Do you like to dance?
- How are the dancers' legs and arms positioned in motion?
- What should a dancer wear?
However, these questions cannot be speculative. Children perceive the world figuratively, so visualization is indispensable. These can be pictures of athletes, footage from famous cartoons (for example, "Well, wait a minute!"), Or photographs of the children themselves. If the kids sculpt the composition "A girl plays with a ball", then for motivation, you can invite all children to repeat 2-3 exercises with the ball, and then discuss which movements were the same, which differed, and also what postures the body assumed.
The game
The story-driven game gives a special interested working atmosphere to the lesson. If we talk about working on plasticine figurines, then a cartoon or book hero can become such a character who includes children in work-play. For example, a symbol of the Olympic Games held in Sochi - Cheburashka - may come to a lesson on the topic of a skier's figure, who will invite the kids to create their own team of skiers.
Children are especially happy to work in the classroom if their favorite hero "comes to visit"
Poems
The rhythm and dynamics of rhymed lines also organize the guys well and set them up for a working mood.
- Once nature and people About the primacy of the dispute started. Storms and blizzards rushed here, Snow covered everything to the rooftops. "Hooray! - nature rejoiced, - In the snows they cannot pass, they cannot survive! ..
- If you can't sleep in the morning, Sleep has escaped somewhere, And pulls into a dance to start - So the day has come to dance!
- I'm a military captain! I'm not afraid of a hurricane! The whole team is on the rebound, We are leading the ship into the storm. We are not in vain at the post! We will protect you, country!
Methodology for drawing up notes
Work on drawing up a lesson plan begins with the formulation of goals and objectives. The main goal-setting factors for sculpting a moving person can be called:
- learning to make a complex plot composition;
- work on the ability to maintain the proportions of the body and other accompanying elements of the composition;
- cultivate independence and patience.
The objectives of the lesson are more specific:
- to fix the method of creating a cylinder-roller to create the base of the figure;
- the development of the ability to convey simple body movements with a stucco structure (bending of the arms / legs, body tilt);
- learning to convey the dynamics of human movement;
- continue to practice anti-aliasing;
- consolidation of the skill to convey the dynamics of the human body in a plastic material;
- repeat the studied geometric shapes (circle, oval, cylinder, ball, etc.);
- develop the ability to work with a stack;
- continue to train fine motor skills, eyes and visual perception;
- expand the boundaries of imagination;
- bring up accuracy in working with plasticine.
After the goals and objectives are formulated, the teacher needs to plan the stages of the lesson so that every minute is involved, and the children, accordingly, do not have time to be distracted.

An example of a lesson summary (abbreviated) - table
| Kargina Natalya "Winter fun, modeling of a human figure in motion" | The teacher shows the children cards with a schematic image of a man in motion. Next, he demonstrates the posture of a person in motion with the help of a visual aid - a human figure. Draws the attention of children to how the hands and feet of the skier are located. After getting acquainted with the characteristic features of a person in motion, the teacher asks the children a question: "Guys, how should a skier be dressed?" The children's answers: "He should be wearing a warm jacket, pants, mittens, a scarf, boots." Educator: right. Now let's now each of you blinds your skier and choose your own color of clothing for him. |
Sequential execution:
Educator: Well, our skier is ready. What good fellows you are. What good skiers we have! |
|
| The teacher sums up the results of the lesson: The children put their skiers on the snow-covered plain of the model, prepared in advance, under the title: "Winter Walk". (The teacher prepares the site from foam and corrugated paper in advance). Consider who has turned out what. Educator: Guys, now you can imagine yourself in the role of your fashioned skiers and play with them at the model ... |
Stage-by-stage work on the compositions "A girl plays with a ball", "Skier", "Soldier"
Flexible figures, capable of assuming a variety of poses, are good material for the manifestation of a child's creative imagination. And the requirement for the realism of products, given by the theme, leads to the need to think logically and comprehend known facts.
Modeling in the preparatory group "A girl plays with a ball"
This composition consists of two parts: sculpting a girl and creating a ball. If time permits, both tasks can be completed in one session. Otherwise, it is better to divide the stages of work into 2 sessions. The last option is more rational, since the proposed composition involves sculpting a girl with facial features and distortions of the dress fabric in the process of movement, that is, the craft is rather complicated.
Step-by-step instructions (little man):

Step-by-step instructions (ball):
- Roll up a blue ball.
- Form 2 yellow sausages and 2 red sausages.
- Flatten each sausage and stretch it into an oval shape.
Children use flattening and stretching techniques to create stripes on the ball.
- Put on the ball, apply a little.
- From 2 pieces of white plasticine we make pancakes, with which we hide the places where the colored stripes converged.
Put the finished ball into the girl's hands
The ball can be put in both hands of the girl or put on one.
Figure "Skier"
So that the legs and arms of the figurine do not fall off, they are formed from parts of the body.
Step-by-step instructions (skier):
- We take a piece of orange plasticine and make a longitudinal cut to the middle - this is the upper body with arms.
- Bend both thin parts outward, roll them a little.
- We also cut a piece of green plasticine (this is the lower part of the body with legs) along the length almost to the base.
Splitting a plasticine part
- Roll up both parts slightly.
- We connect the body into a single figure.
- We make 2 balls from green plasticine - pens with gloves.
- We attach the parts to the arms.
This is how hands and feet are made for a skier
- We make ovals from orange plasticine, press them in the middle - these are the man's shoes.
- We put our feet into the boots.
- We make a head from beige plasticine, show the nose with a small dot.
- We attach the head to the body.
- We make a thin scarf - a flattened sausage, with which we hide the junction of the head and body.
- We make a hat from a small green ball, making a depression in the blank.
- We mark a pom-pom on the cap with a small piece of orange.
- We put a hat on our head.
- Put a piece of plasticine on the head of 2 matches - these are ski poles.
- From a piece of yellow, we form 2 long sausages, on which we slightly sharpen and bend up one end - these are skis.
- We put a person on skis, we give sticks in hand.
You can use toothpicks for ski poles, but it's more convenient for children to work with matches.
Figure "Soldier"
Instructions:
- Cut a piece of green plasticine in half to the middle, bend two parts down, slightly smooth out the elements, rounding them. This is the upper body with arms. "
This is how the torso is done with arms
- Cut another piece almost to the base, again roll up two thin parts. This is the lower torso with legs.
- We connect the parts.
- From a piece of beige plasticine we form a ball - the head of a soldier.
- From two small pieces of beige, we make a ball for the palms, clenched into fists.
The torso and legs of a plasticine soldier
- We form a thin long brown sausage - a soldier's tunic belt.
- We make a ball out of green material, form a pancake from it - a shaped cap.
- We make boots from a piece of black plasticine. To do this, roll up the sausage, bend 1/3 at a right angle.
Add the belt and boots for the cap
- We make a second boot and attach both to the legs.
- We spread our arms and legs so that it can be seen that the soldier is walking. To do this, bend one arm at the elbow, and take the other back. Stretch the legs in a step.
 The skater's legs need to be rolled well so that they do not break when the child bends them. Modeling on the plane. The guys made a moving figure of a man back in senior group Our boy can also remove snow. The considered method of sculpting gives a lot of room for imagination. For support, a frame is sometimes inserted into plasticine sculptures
The plasticine figure of a person, which has pronounced limbs, is good because it allows you to come up with many games and combinations. You can even shoot a whole plasticine cartoon.
In the preparatory group, sculpting a person in motion allows you to put into practice all the techniques of working with plasticine that were known to the guys before. The creation of complex compositions can be timed to coincide with almost any occasion (holiday, memorable date) or topic in calendar-thematic planning. However, drawing up a synopsis of a human sculpting lesson in dynamics requires the teacher to have a well-thought-out structure, a competent distribution of time (up to dividing the amount of work into 2 lessons), since there are a lot of small elements in the craft that can be difficult for kids to cope with.
in the direction of artistic creation (modeling)
"Skiers (making a model)".
Compiled by the educator of the 5th group:
Moscow, 2014
Goals:
Raise interest in winter sports, the desire to participate in outdoor games themselves.
Program tasks:
"Cognition"
Accumulation and enrichment of children's knowledge about the Olympic movement.
Strengthen children's knowledge of the symbols and rituals of the Olympic Games.
Develop cognitive initiative .
"Communication"
Develop children's knowledge of winter sports.
Activate children's vocabulary: continent, torch, emblem, talisman.
« Artistic creation(modeling) "
Strengthen children's skills to sculpt a person in motion, use the technique of sculpting from a whole piece.
Practice sculpting techniques: smoothing, stretching, flattening.
"Socialization"
Develop communication skills, interaction skills between children.
Preliminary work : reading fiction on sports topics, talking and looking at illustrations about sports.
Equipment: Layout of a ski stadium with the attributes of the Olympics -
(flag with Olympic symbols, torch with Olympic flame, talismans).
Flag of Russia, didactic material, figurines of forest animals, sculpting boards according to the number of children, plasticine, stacks, cloths for hands, two sticks for each.
Stroke
The teacher unnoticed before the arrival of the children leaves a beautiful envelope with a letter. The children who come pay attention to the envelope and show interest in it. The teacher apologizes for forgetting to show it to the children, saying that he will open the envelope as all the children gather, that is, after breakfast.
Children are waiting, making guesses from "who" and "where". The time has come - the teacher reads the letter.
Educator:Hello, dear guys from the "Druzhnaya family" group. Talismans greet you Olympic Movement in the city of Sochi: Bunny, Bear and Leopard. We would like to know how you prepare for the Olympics in your kindergarten and at home. See you soon in kindergarten.
Educator:How are we going to prepare for a meeting with guests?
Children:Let's put things in order, prepare our drawings with the Olympics.
Educator:Guys, what do you think it will be interesting for the Talismans to hear from us?
Children:Probably about what the Olympics are.
Educator:What is it?
De ty: This is such a sports festival, which brings together athletes from different countries.
Educator: And for what?
Children:To find out who is stronger .
Educator:Guys, how many knows where the Olympic movement originated?
Children:In ancient Greece, Olympia.
Educatorb: Children, you said that athletes are going to measure their strength, but don't you want to compete with each other?
Children: We want.
Educator:What needs to be done for this?
The teacher at this time exhibits a model with Olympic symbols, figurines of forest animals, a poster with a fire and a flag of Russia.
The teacher takes turns asking questions to each team.
Question to the first team: The teacher asks a question, paying attention to the imitation of the Olympic flame. What does it look like?
First command:To the Olympic flame.
Educator: Right, and in what cases is the Olympic flame lit?
Children:When the Olympics take place.
Educator: You have earned one point.
Question to the second team: What is shown in this poster?
Second command: It's a bonfire.
Educator: Where do we use it?
Children:Probably to keep warm, fry kebabs, burn trash .
Educator: Right, you also earn a point.
Educator: Who can tell where we can see such a flag?
Children: In the country where the Olympics are held .
Educator: You are awarded the second point. The second question for your team. Which country flag am I holding in my hands?
First team: Flag of Russia.
Educator: What do these three colors mean?
Children: White is clouds, blue is the sea, red is fire.
Educatorb: Third question: What kind of animals are they gathered here?
Second command: These are talismans .
Educator: Why did you choose them?
The teacher listens to the reasoning of the children and complements their answers.
Educator: You are awarded the third point.
Guys, why didn't they take these animals?
Children:Because they are just wild animals.
Educator:Children, I want to ask the first team, what do the rings on the Olympic flag mean?
Children:This is the friendship of all continents:
Blue - Europe
Black - Africa
Red - America
Yellow - Asia
Green - Australia
Educator:Well done, you have a fourth point.
Guys, listen to how beautiful the words sound:
5 rings on the white flag
Intertwined with each other
Like all the athletes in the world
They held hands tightly.
Educator:And now the second team will lay out the emblem from the rings .
Children stand on the carpet and lay out the Olympic emblem in proper order.
Educator:It's time to take stock: each team got 4 points .
You can be proud of your knowledge. Well done!
Educateeh: To be strong and dexterous -
Training will help us!
Get up for a physical exercise.
We put our hands on our shoulders
We start to rotate them,
So we will correct the posture
One, two, three, four, five!
We put our hands in front of the chest
Parting to the sides
We will do exercises
In any weather.
Raise your right hand
And let us lower the other down,
We swap them
We move our hands smoothly.
Now let's get together
Let's walk everything in place!
Educator:We sit down. You have cut pictures on your table, I propose to collect them and say what they mean?
Children collect cards.
Children: And we turned out to be athletes.
The following sports are listed: biathlon, speed skating, alpine skiing, hockey, snowboarding, bobsleigh.
Educator: Guys, what season are these sports associated with?
Children: Happy winter.
Educator: Children, what kind of sport is our layout suitable for?
I will help you with a riddle:
There is such a sport in the world
It is popular in winter.
You run on runners
You are in a hurry for your opponent.
Children: Skiers .
Educator:Well done, and now we will fashion skiers to show them to our future guests.
Modeling from a whole piece.
1. Cut off the fourth part of the sausage and halve it.
One part per head (3), others for skis.
2. Cuts in half, one third from the top (hands - 1)
And an incision from the bottom is also a third (legs - 2)
3. Stretch the arms and legs and bend them at the elbows and knees.
4. Skis (4), flattened sausages.
font-size: 14.0pt "> 

Educator:The skiers team is ready. Well done, I think the mascots will love our work.
Children admire their work.